Lab 8: Navigation Controller
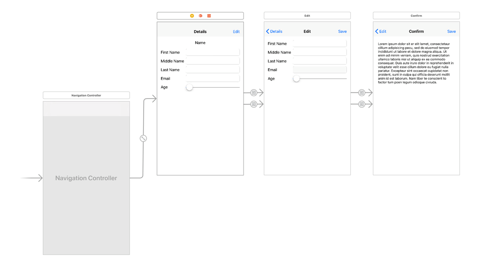
In this session we will use a Navigation Controller to achieve the same work flow we used in Lab7. We will add an additional scene that will present a confirmation screen to the user before saving the information. We will use a Navigation Controller, which will render a standard Navigation Bar at the top of the application, with a title and a forward and backward button as appropriate.
Create a new project named lab8. Copy the Person.swift file from Lab7 to the project.
Storyboard
We will use three View Controllers in our storyboard. Drag and drop two View Controller objects from the object library to the storyboard. Click the initial scene and click the Editor->Embed In->Navigation Controller menu to let a Navigation Controller take over the initial view controller.

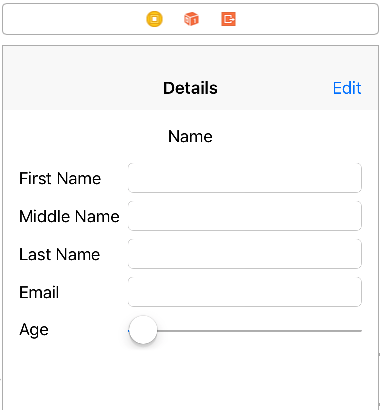
Layout the initial scene similar to lab7. Set up the view controller outlets also similar to lab7. Control+Drag a connection from the Edit (Bar Button Item) button to the second scene and select “Show” as the option. Set the title for the Navigation Bar to “Details”.

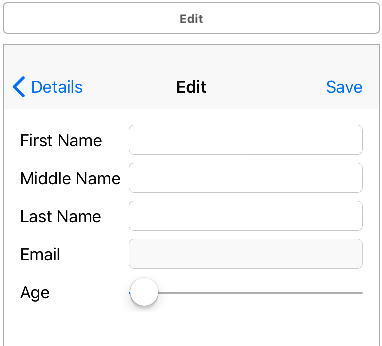
Layout the second scene similar to lab7 using an EditViewController. Drag and drop a Navigation Item to the second scene, to bring in the Navigation Bar into the scene. Set its title to “Edit”, and drop a Bar Button Item to it and name it “Save”. Control+Drag a connection from the Save button to scene three.

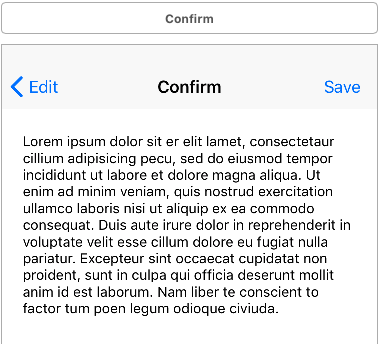
Layout the third scene with just a Text View as follows. Create a SaveViewController and use it with the scene. Add a Navigation Item and Bar Button Item to the scene. Connect the Save button to the “Exit” icon. Choose the action function from the first ViewController to connect to. Create and connect an outlet in the view controller to the text view.


Layout the initial scene similar to lab7. Set up the view controller outlets also similar to lab7. Control+Drag a connection from the Edit (Bar Button Item) button to the second scene and select “Show” as the option. Set the title for the Navigation Bar to “Details”.

Layout the second scene similar to lab7 using an EditViewController. Drag and drop a Navigation Item to the second scene, to bring in the Navigation Bar into the scene. Set its title to “Edit”, and drop a Bar Button Item to it and name it “Save”. Control+Drag a connection from the Save button to scene three.

Layout the third scene with just a Text View as follows. Create a SaveViewController and use it with the scene. Add a Navigation Item and Bar Button Item to the scene. Connect the Save button to the “Exit” icon. Choose the action function from the first ViewController to connect to. Create and connect an outlet in the view controller to the text view.

ViewController
The modified ViewController is as follows. Note that we have modified the updatePerson segue action function to use the SaveViewController, since that is the controller from which the “Exit” action is triggered.
class ViewController: UIViewController {

  override func viewDidLoad() {
    super.viewDidLoad()
    createPerson()
    if let person = repository.by(email: emailAddress) {
      name.text = person.name
      firstName.text = person.firstName
      middleName.text = person.middleName
      lastName.text = person.lastName
      email.text = person.email
      age.value = Float(person.age)
    }
  }

  override func didReceiveMemoryWarning() {
    super.didReceiveMemoryWarning()
  }

  override func prepare(for segue: UIStoryboardSegue, sender: Any?) {
    let controller = segue.destination as! EditViewController
    controller.person = repository.by(email: emailAddress)
  }

  @IBAction func updatePerson(segue: UIStoryboardSegue) {
    let controller = segue.source as! SaveViewController
    if var person = repository.by(email: emailAddress) {
      if let p = controller.person {
        person.firstName = p.firstName
        person.middleName = p.middleName
        person.lastName = p.lastName
        person.age = p.age
        let _ = repository.save(person: person)

        name.text = person.name
        firstName.text = person.firstName
        middleName.text = person.middleName
        lastName.text = person.lastName
        email.text = person.email
        age.value = Float(person.age)
      }
    }
  }

  private func createPerson() {
    let person = repository.by(email: emailAddress)
    if person == nil {
      let p = Person(firstName:"User", middleName: nil, lastName:"One", email:emailAddress, age: 10)
      let _ = repository.save(person: p)
    }
  }

  private let repository = PersonRepository.instance
  private var emailAddress = "user@one.com"

  @IBOutlet weak var name: UILabel!
  @IBOutlet weak var firstName: UITextField!
  @IBOutlet weak var middleName: UITextField!
  @IBOutlet weak var lastName: UITextField!
  @IBOutlet weak var email: UITextField!
  @IBOutlet weak var age: UISlider!
}
EditViewController
The EditViewController now has a prepareForSegue function to handle the transition from the edit scene to the confirmation scene.
class EditViewController: UIViewController {

  override func viewDidLoad() {
    super.viewDidLoad()
    if let p = person {
      firstName.text = p.firstName
      middleName.text = p.middleName
      lastName.text = p.lastName
      email.text = p.email
      age.value = Float(p.age)
    }
  }

  override func didReceiveMemoryWarning() {
    super.didReceiveMemoryWarning()
  }

  override func prepare(for segue: UIStoryboardSegue, sender: Any?) {
    if let email = person?.email {
      let controller = segue.destination as! SaveViewController
      var person = repository.by(email: email)!
      person.firstName = firstName.text!
      person.middleName = middleName.text
      person.lastName = lastName.text!
      person.email = email
      person.age = Int16(age.value)
      controller.person = person
    }
  }

  @IBOutlet weak var firstName: UITextField!
  @IBOutlet weak var middleName: UITextField!
  @IBOutlet weak var lastName: UITextField!
  @IBOutlet weak var email: UITextField!
  @IBOutlet weak var age: UISlider!
  var person : Person? = nil
  private let repository = PersonRepository.instance
}
SaveViewController
The SaveViewController uses a Text View to display a HTML representation of the edited information for the person. The user may either go back to the “Edit” scene, or “Save” and go back to the initial “Details” scene.
extension NSAttributedString {

  internal convenience init?(html: String) {
    guard let data = html.data(using: String.Encoding.utf16, allowLossyConversion: false) else {
      return nil
    }

    guard let attributedString = try? NSMutableAttributedString(data: data, options: [NSAttributedString.DocumentReadingOptionKey.documentType: NSAttributedString.DocumentType.html], documentAttributes: nil) else {
      return nil
    }

    self.init(attributedString: attributedString)
  }
}

class SaveViewController: UIViewController {

    override func viewDidLoad() {
      super.viewDidLoad()
      display()
    }

    override func didReceiveMemoryWarning() {
      super.didReceiveMemoryWarning()
    }

  @IBOutlet weak var textView: UITextView!
  var person : Person? = nil

  private func display() {
    if let p = person {
      let middleName = p.middleName != nil ? p.middleName! : ""
      let email = p.email != nil ? p.email! : ""

      let html =
"""
<div>
  <label>First Name:</label> <label>\(p.firstName)</label><br/>
  <label>Middle Name:</label> <label>\(middleName)</label><br/>
  <label>Last Name:</label> <label>\(p.lastName)</label><br/>
  <label>Email:</label> <label>\(email)</label><br/>
  <label>Age:</label> <label>\(p.age)</label>
</div>
<br/><br/>
<div>Click <b>Save</b> button to save this information, or the <b>Edit</b>
button to go back and re-edit the information.</div>
"""

      let attrStr = NSAttributedString(html: html)
      textView.attributedText = attrStr
    }
  }
}
Xcode 9.0.1+ Modification
Xcode 9.0.1 and up will need a slight modification to the NSAttributedString extension.
Xcode 9.0.1 and up will need a slight modification to the NSAttributedString extension.
extension NSAttributedString {

    internal convenience init?(html: String) {
        guard let data = html.data(using: String.Encoding.utf16, allowLossyConversion: false) else {
            return nil
        }

        guard let attributedString = try? NSMutableAttributedString(data: data, options: [NSDocumentTypeDocumentAttribute: NSHTMLTextDocumentType], documentAttributes: nil) else {
            return nil
        }

        self.init(attributedString: attributedString)
    }
}
extension NSAttributedString {

    internal convenience init?(html: String) {
        guard let data = html.data(using: String.Encoding.utf16, allowLossyConversion: false) else {
            return nil
        }

        guard let attributedString = try? NSMutableAttributedString(data: data, options: [NSDocumentTypeDocumentAttribute: NSHTMLTextDocumentType], documentAttributes: nil) else {
            return nil
        }

        self.init(attributedString: attributedString)
    }
}
