Lesson 9
Processes
When an application component starts and the application does not have any other components running, the Android system starts a new Linux process for the application with a single thread of execution. By default, all components of the same application run in the same process and thread (called the "main" thread). If an application component starts and there already exists a process for that application (because another component from the application exists), then the component is started within that process and uses the same thread of execution. However, you can arrange for different components in your application to run in separate processes, and you can create additional threads for any process.
The manifest entry for each type of component element—<activity>, <service>, <receiver>, and <provider>—supports an android:process attribute that can specify a process in which that component should run. You can set this attribute so that each component runs in its own process or so that some components share a process while others do not.
The <application> element also supports an android:process attribute, to set a default value that applies to all components.
Android might decide to shut down a process at some point, when memory is low and required by other processes that are more immediately serving the user. Application components running in the process that's killed are consequently destroyed. A process is started again for those components when there's again work for them to do.
When deciding which processes to kill, the Android system weighs their relative importance to the user. For example, it more readily shuts down a process hosting activities that are no longer visible on screen, compared to a process hosting visible activities. The decision whether to terminate a process, therefore, depends on the state of the components running in that process.
Threads
When an application is launched, the system creates a thread of execution for the application, called "main." This thread is in charge of dispatching events to the appropriate user interface widgets, including drawing events. It is also the thread in which your application interacts with components from the Android UI toolkit (components from the android.widget and android.view packages). The main thread is also sometimes called the UI thread.
The system does not create a separate thread for each instance of a component. All components that run in the same process are instantiated in the UI thread, and system calls to each component are dispatched from that thread. Consequently, methods that respond to system callbacks (such as onKeyDown() to report user actions or a lifecycle callback method) always run in the UI thread of the process.
When your app performs intensive work in response to user interaction, this single thread model can yield poor performance unless you implement your application properly. If everything is implemented in the UI thread, performing long operations such as network access or database queries will block the whole UI. When the thread is blocked, no events can be dispatched, including drawing events. From the user's perspective, the application appears to hang. Even worse, if the UI thread is blocked for more than a few seconds (about 5 seconds currently) the user is presented with the "application not responding" (ANR) dialog.
The Android UI toolkit is not thread-safe. So, you must not manipulate your UI from a worker thread—you must do all manipulation to your user interface from the UI thread. Thus, there are simply two rules to Android's single thread model:
- Do not block the UI thread
- Do not access the Android UI toolkit from outside the UI thread
Worker threads
If you have operations to perform that are not instantaneous, you should perform them in separate threads ("background" or "worker" threads).

At first, this seems to work fine, because it creates a new thread to handle the network operation. However, it violates the second rule of the single-threaded model: do not access the Android UI toolkit from outside the UI thread—this sample modifies the ImageView from the worker thread instead of the UI thread. This can result in undefined and unexpected behaviour, which can be difficult and time-consuming to track down.
To fix this problem, Android offers several ways to access the UI thread from other threads. Here is a list of methods that can help:
AsyncTask
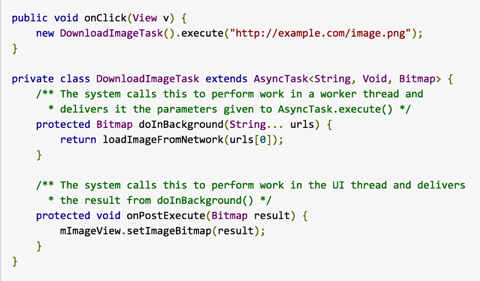
AsyncTask allows you to perform asynchronous work on your user interface. It performs the blocking operations in a worker thread and then publishes the results on the UI thread, without requiring you to handle threads and/or handlers yourself.
To use it, you must subclass AsyncTask and implement the doInBackground() callback method, which runs in a pool of background threads. To update your UI, you should implement onPostExecute(), which delivers the result from doInBackground() and runs in the UI thread, so you can safely update your UI. You can then run the task by calling execute() from the UI thread.

Now the UI is safe and the code is simpler, because it separates the work into the part that should be done on a worker thread and the part that should be done on the UI thread.
- You can specify the type of the parameters, the progress values, and the final value of the task, using generics
- The method doInBackground() executes automatically on a worker thread
- onPreExecute(), onPostExecute(), and onProgressUpdate() are all invoked on the UI thread
- The value returned by doInBackground() is sent to onPostExecute()
- You can call publishProgress() at anytime in doInBackground() to execute onProgressUpdate() on the UI thread
- You can cancel the task at any time, from any thread
Caution: A problem you might encounter when using a worker thread is unexpected restarts in your activity due to a runtime configuration change (such as when the user changes the screen orientation), which may destroy your worker thread. To see how you can persist your task during one of these restarts and how to properly cancel the task when the activity is destroyed, see the source code for the Shelves sample application.
Data Storage
Android provides several options for you to save persistent application data. The solution you choose depends on your specific needs, such as whether the data should be private to your application or accessible to other applications (and the user) and how much space your data requires.
Your data storage options are the following:
- Shared Preferences - Store private primitive data in key-value pairs.
- Internal Storage - Store private data on the device memory.
- External Storage - Store public data on the shared external storage.
- SQLite Databases - Store structured data in a private database.
- Network Connection - Store data on the web with your own network server.
Android provides a way for you to expose even your private data to other applications — with a content provider. A content provider is an optional component that exposes read/write access to your application data, subject to whatever restrictions you want to impose.
Shared Preferences
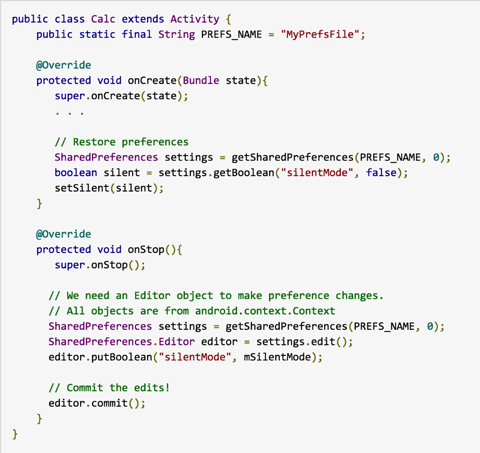
The SharedPreferences class provides a general framework that allows you to save and retrieve persistent key-value pairs of primitive data types. You can use SharedPreferences to save any primitive data: booleans, floats, ints, longs, and strings. This data will persist across user sessions (even if your application is killed).
To get a SharedPreferences object for your application, use one of two methods:
- getSharedPreferences() - Use this if you need multiple preferences files identified by name, which you specify with the first parameter.
- getPreferences() - Use this if you need only one preferences file for your Activity. Because this will be the only preferences file for your Activity, you don't supply a name.
To write values:
- Call edit() to get a SharedPreferences.Editor.
- Add values with methods such as putBoolean() and putString().
- Commit the new values with commit()
To read values, use SharedPreferences methods such as getBoolean() and getString().

User Preferences
Shared preferences are not strictly for saving "user preferences," such as what ringtone a user has chosen. If you're interested in creating user preferences for your application, see PreferenceActivity, which provides an Activity framework for you to create user preferences, which will be automatically persisted (using shared preferences).
Internal Storage
You can save files directly on the device's internal storage. By default, files saved to the internal storage are private to your application and other applications cannot access them (nor can the user). When the user uninstalls your application, these files are removed.
To create and write a private file to the internal storage:
- Call openFileOutput() with the name of the file and the operating mode. This returns a FileOutputStream.
- Write to the file with write().
- Close the stream with close().

MODE_PRIVATE will create the file (or replace a file of the same name) and make it private to your application. Other modes available are:MODE_APPEND, MODE_WORLD_READABLE, and MODE_WORLD_WRITEABLE (constants with world privileges have been deprecated and are discouraged).
To read a file from internal storage:
- Call openFileInput() and pass it the name of the file to read. This returns a FileInputStream.
- Read bytes from the file with read().
- Then close the stream with close().
Tip: If you want to save a static file in your application at compile time, save the file in your project res/raw/ directory. You can open it with openRawResource(), passing the R.raw.<filename> resource ID. This method returns an InputStream that you can use to read the file (but you cannot write to the original file).
Saving cache files
If you wish to cache some data, rather than store it persistently, you should use getCacheDir() to open a File that represents the internal directory where your application should save temporary cache files.
When the device is low on internal storage space, Android may delete these cache files to recover space. However, you should not rely on the system to clean up these files for you. You should always maintain the cache files yourself and stay within a reasonable limit of space consumed, such as 1MB. When the user uninstalls your application, these files are removed.
External Storage
Every Android-compatible device supports a shared "external storage" that you can use to save files. This can be a removable storage media (such as an SD card) or an internal (non-removable) storage. Files saved to the external storage are world-readable and can be modified by the user when they enable USB mass storage to transfer files on a computer.
Caution: External storage can become unavailable if the user mounts the external storage on a computer or removes the media, and there's no security enforced upon files you save to the external storage. All applications can read and write files placed on the external storage and the user can remove them.
Getting access to external storage
In order to read or write files on the external storage, your app must acquire the READ_EXTERNAL_STORAGE or WRITE_EXTERNAL_STORAGE system permissions.

If you need to both read and write files, then you need to request only the WRITE_EXTERNAL_STORAGE permission, because it implicitly requires read access as well.
Note: Beginning with Android 4.4, these permissions are not required if you're reading or writing only files that are private to your app.
Checking media availability
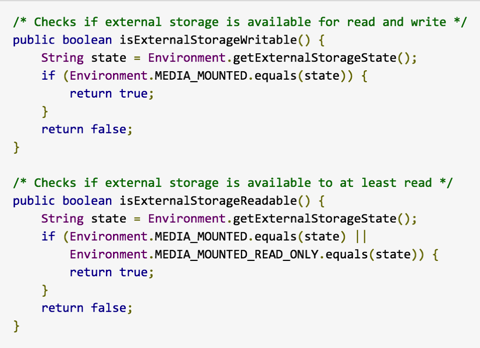
Before you do any work with the external storage, you should always call getExternalStorageState() to check whether the media is available. The media might be mounted to a computer, missing, read-only, or in some other state.

The getExternalStorageState() method returns other states that you might want to check, such as whether the media is being shared (connected to a computer), is missing entirely, has been removed badly, etc. You can use these to notify the user with more information when your application needs to access the media.
Saving files that can be shared with other apps
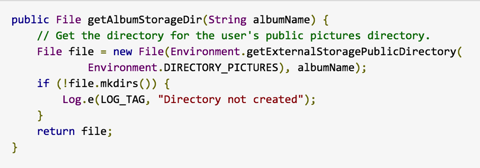
Generally, new files that the user may acquire through your app should be saved to a "public" location on the device where other apps can access them and the user can easily copy them from the device. When doing so, you should use to one of the shared public directories, such as Music/, Pictures/, and Ringtones/.
To get a File representing the appropriate public directory, call getExternalStoragePublicDirectory(), passing it the type of directory you want, such as DIRECTORY_MUSIC, DIRECTORY_PICTURES, DIRECTORY_RINGTONES, or others. By saving your files to the corresponding media-type directory, the system's media scanner can properly categorise your files in the system (for instance, ringtones appear in system settings as ringtones, not as music).

Hiding your files from the Media Scanner
Include an empty file named .nomedia in your external files directory (note the dot prefix in the filename). This prevents media scanner from reading your media files and providing them to other apps through the MediaStore content provider.
Saving files that are app-private
If you are handling files that are not intended for other apps to use (such as graphic textures or sound effects used by only your app), you should use a private storage directory on the external storage by calling getExternalFilesDir(). This method also takes a type argument to specify the type of subdirectory (such as DIRECTORY_MOVIES). If you don't need a specific media directory, pass null to receive the root directory of your app's private directory.
Beginning with Android 4.4, reading or writing files in your app's private directories does not require the READ_EXTERNAL_STORAGE orWRITE_EXTERNAL_STORAGE permissions. So you can declare the permission should be requested only on the lower versions of Android by adding the maxSdkVersion attribute:

Note: When the user uninstalls your application, this directory and all its contents are deleted. Also, the system media scanner does not read files in these directories, so they are not accessible from the MediaStore content provider. As such, you should not use these directories for media that ultimately belongs to the user, such as photos captured or edited with your app, or music the user has purchased with your app—those files should be saved in the public directories.
Saving cache files
To open a File that represents the external storage directory where you should save cache files, call getExternalCacheDir(). If the user uninstalls your application, these files will be automatically deleted.
Tip: To preserve file space and maintain your app's performance, it's important that you carefully manage your cache files and remove those that aren't needed anymore throughout your app's lifecycle.
Work on Lab8
